Contents
Recently, we launched a major release of Stacks Connect which now boasts fewer dependencies and a simplified and standardized interface, making it easier for wallets to add new functionality in the future.
Most importantly, the new Connect package dramatically improves how wallets connect with dapps by leveraging a simple protocol that focuses on using RPC methods directly instead of unnecessarily wrapping RPC payloads in jsontokens. Previously, there were also many instances of wallet provider conflicts in the <code-rich-text>window<code-rich-text> object, but with this new package, there is a defined recommended wallet provider object and proper discovery mechanism allowing for anyone to build their own wallet and have it discovered by applications using Connect.
But how exactly does Stacks Connect enable wallets to connect with applications? In this post, we’ll show you how by building our own Stacks wallet. For a video walkthrough, check this out:
Get Started with a Stacks Wallet Template
First, we need to set up your wallet project. To do so, create an account in the Hiro Platform and create a new project using the new wallet template. This will clone the template to a GitHub repository.
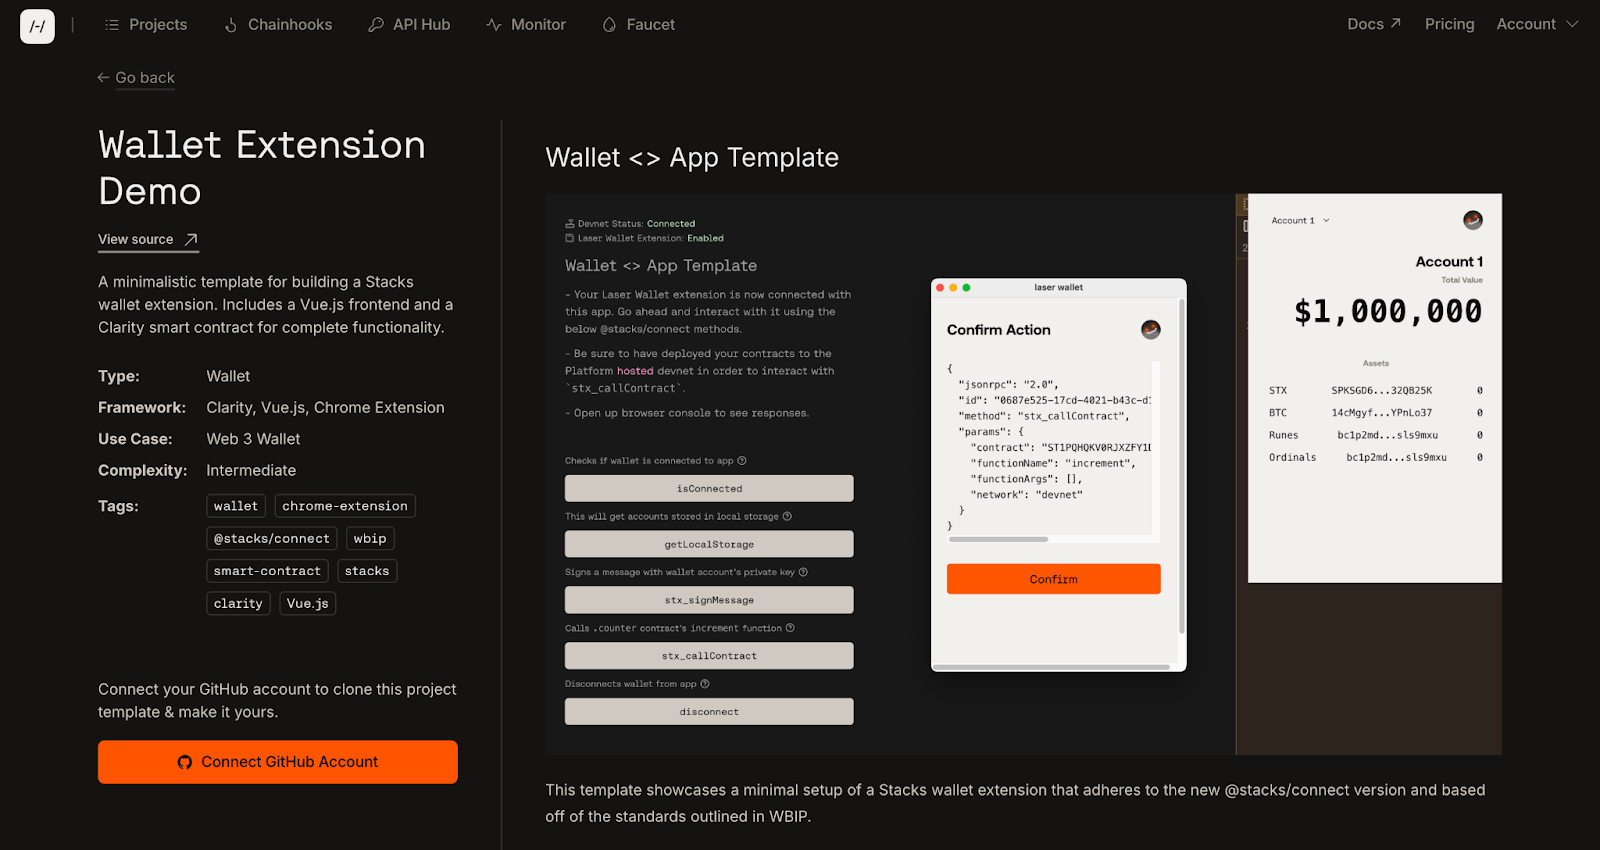
This template is a Chrome extension that comes with basic wallet functionalities, such as generating Stacks and Bitcoin addresses, changing accounts, and importing of external mnemonic seed phrases. Using this template as a starting point, you can build on this template to add other wallet features, such as displaying Stacks NFTs, fetching Ordinals or Runes balances with our dedicated APIs, securing of user mnemonic seed phrases, and much more.
Enable Your Custom Wallet to be Detected by Stacks Apps
This wallet template has Connect conformability. Now we will show you how your wallet can interact with incoming JSON RPC 2.0 requests and responses to handle modern Connect methods in order to connect to apps. But first, some context.
Now that we have your wallet template set up, you’ll want to make sure you have a good understanding of the different context script standards of a Chrome extension. The context scripts mainly consist of your popup script, background script, and content script.
3 scripts of a Chrome extension:
- Popup: This is the main script that handles the visual UI of the actual popup modal when interacting with an extension.
- Background: This script allows your extension to hand off logic that may require intensive computation or for dealing with secure data.
- Content: This allows your extension to interact with the web page itself.
In your content script, which enables you to run scripts on the web page a user is currently on, you’ll want to “inject” a <code-rich-text>StacksProvider<code-rich-text> object type into the global <code-rich-text>window<code-rich-text> object of the web page. It’s important to note that this must be handled by your extension’s content script, which should automatically load anytime you land on a webpage. This injected object is what will allow web apps to directly interact with your wallet. It’s like your wallet extension saying, “Hey! I’m available to communicate with your app, let’s connect!”
The <code-rich-text>StacksProvider<code-rich-text> object needs to at least have a <code-rich-text>.request<code-rich-text> method that takes in the name of a string literal method, and an parameters object.
This <code-rich-text>StacksProvider<code-rich-text> object type could be named anything. In the example above, it’s named <code-rich-text>MyProvider<code-rich-text>.
From here, web apps can directly call your wallet extension provider via <code-rich-text>window.MyProvider<code-rich-text> directly, and you don’t even need to use the Stacks Connect library. However, your wallet app would need to manually handle other important implementation details, such as the storage of the wallet info and individual method calling.
But with the Connect library, apps don’t have to manually roll their own methods and implementations. The Connect library will handle all those functionalities for the app.
Adding Your Wallet to the Connect Modal

In order for you to make your wallet provider object (from the previous section) be discoverable by the Connect modal UI wallet selector, you’ll need to then pass it into a separate <code-rich-text>wbip_providers<code-rich-text> array on the <code-rich-text>window<code-rich-text> object. The <code-rich-text>wbip_providers<code-rich-text> array is a new standard set forth by WBIP004.
Any wallet that registers their provider in this array is declaring that they are conforming to the WBIP standards, which are a set of specifications for web apps and client providers to facilitate communication with Bitcoin-related apps. Wallets SHOULD register their provider information under <code-rich-text>window.wbip_providers<code-rich-text> to be discoverable by websites/libraries expecting this WBIP.
From here, the wallet template has already set up proper communication flows between a web page and your extension by leveraging your extension’s context scripts. To learn more about this, check uot the flow chart in the template description which explains what that communication flow looks like.
Handling Method Requests and Responses
Structuring the manner in which your wallet handles methods internally is up to your discretion (most methods can be properly handled by methods from @stacks/transactions), but receiving and responding to messages should adhere to the JSON RPC 2.0 standard and data types based on the string literal methods of the incoming request.
Let’s take the most basic function of connecting. From the Connect modal UI wallet selector, once a user clicks on the <code-rich-text>connect<code-rich-text> button of your wallet, it will invoke the string literal method of <code-rich-text>getAddresses<code-rich-text>, which accepts an optional parameter of network.
Once your wallet receives this JSON RPC 2.0 request message, it needs to handle the request and then return a response that conforms to the return type for <code-rich-text>getAddresses<code-rich-text>.
Using the <code-rich-text>MethodParams<code-rich-text> and <code-rich-text>MethodResult<code-rich-text> type helpers from the Connect library can help you here. Here’s a simplified example of how your wallet should handle the string literal method of <code-rich-text>getAddresses<code-rich-text>, which allows a standard connection between your wallet and app.
You can also add your own unstandardized methods to your wallet. However, the minimum recommended methods to handle basic wallet functions are standardized and include:
- <code-rich-text>getAddresses<code-rich-text>
- <code-rich-text>sendTransfer<code-rich-text>
- <code-rich-text>signPsbt<code-rich-text>
- <code-rich-text>stx_getAddresses<code-rich-text>
- <code-rich-text>stx_transferStx<code-rich-text>
- <code-rich-text>stx_callContract<code-rich-text>
- <code-rich-text>stx_signMessage<code-rich-text>
- <code-rich-text>stx_signStructuredMessage<code-rich-text>
Start Building With Hiro’s Wallet Template
It’s important to have an ecosystem that boasts a plethora of diverse wallet providers for different use cases, and learning how to build a wallet is a great entry point to Web3 and the Stacks ecosystem. Check out this article to learn more about the importance of web3 wallets for web3 founders.
Then get started and explore the wallet template to understand one of the fundamental building blocks of Web3.